
POV-Ray uses a method called three-dimensional solid texturing to define the color, bumpiness and other properties of an object. You specify the way that the texture varies over a surface by specifying a pattern. Patterns are used in pigments, normals and texture maps as well as media density.
All patterns in POV-Ray are three dimensional. For every point in space, each pattern has a unique value. Patterns do not wrap around a surface like putting wallpaper on an object. The patterns exist in 3d and the objects are carved from them like carving an object from a solid block of wood or stone.
Consider a block of wood. It contains light and dark bands that are concentric cylinders being the growth rings of the wood. On the end of the block you see these concentric circles. Along its length you see lines that are the veins. However the pattern exists throughout the entire block. If you cut or carve the wood it reveals the pattern inside. Similarly an onion consists of concentric spheres that are visible only when you slice it. Marble stone consists of wavy layers of colored sediments that harden into rock.
These solid patterns can be simulated using mathematical functions. Other random patterns such as granite or bumps and dents can be generated using a random number system and a noise function.
In each case, the x, y, z coordinate of a point on a surface is used to compute some mathematical function that returns a float value. When used with color maps or pigment maps, that value looks up the color of the pigment to be used. In normal statements the pattern function result modifies or perturbs the surface normal vector to give a bumpy appearance. Used with a texture map, the function result determines which combinations of entire textures to be used. When used with media density it specifies the density of the particles or gasses.
The following sections describe each pattern. See the sections "Pigment", "Normal", "Patterned Textures" and "Density" for more details on how to use patterns. Unless mentioned otherwise, all patterns use the ramp_wave wave type by default but may use any wave type and may be used with color_map, pigment_map, normal_map, slope_map, texture_map, density, and density_map.
The agate pattern is a banded pattern similar to marble but it uses a specialized built-in turbulence function that is different from the traditional turbulence. The traditional turbulence can be used as well but it is generally not necessary because agate is already very turbulent. You may control the amount of the built-in turbulence by adding the optional agate_turb keyword followed by a float value. For example:
  pigment {

    agate

    agate_turb 0.5

    color_map {MyMap}

  }
Technically average is not a pattern type but it is listed here because the syntax is similar to other patterns. Typically a pattern type specifies how colors or normals are chosen from a pigment_map¸ texture_map, density_map, or normal_map, however average tells POV-Ray to average together all of the patterns you specify. Average was originally designed to be used in a normal statement with a normal_map as a method of specifying more than one normal pattern on the same surface. However average may be used in a pigment statement with a pigment_map or in a texture statement with a texture_map or media density with density_map to average colors too.
When used with pigments, the syntax is:
pigment {

pigment_map{ }
}
[ ]
Where Weight is an optional float value that defaults to 1.0 if not specified. This weight value is the relative weight applied to that pigment. Each PIGMENT_BODY is anything which can be inside a pigment{...} statement. The pigment keyword and {} braces need not be specified.
Note that the [] brackets are part of the actual PIGMENT_MAP_ENTRY. They are not notational symbols denoting optional parts. The brackets surround each entry in the pigment_map. There may be from 2 to 256 entries in the map.
For example
pigment {
average
pigment_map {
[1.0 Pigment_1]
[2.0 Pigment_2]
[0.5 Pigment_3]
}

}
All three pigments are evaluated. The weight values are multiplied by the resulting color. It is then divided by the total of the weights which, in this example is 3.5. When used with texture_map or density_map it works the same way.
When used with a normal_map in a normal statement, multiple copies of the original surface normal are created and are perturbed by each pattern. The perturbed normals are then weighted, added and normalized.
See the sections "Pigment Maps and Pigment Lists", "Normal Maps and Normal Lists", "Texture Maps", and "_Ref418337433" for more information.
The boxed pattern creates a 2x2x2 unit cube centered at the origin. It is computed by:
value =1.0- min(1, max(abs(X), abs(Y), abs(Z)))
It starts at 1.0 at the origin and increases to a minimum value of 0.0 as it approaches any plane which is one unit from the origin. It remains at 0.0 for all areas beyond that distance. This pattern was originally created for use with halo or media but it may be used anywhere any pattern may be used.
The bozo pattern is a very smooth, random noise function that is traditionally used with some turbulence to create clouds. The spotted pattern is identical to bozo but in early versions of POV-Ray spotted did not allow turbulence to be added. Turbulence can now be added to any pattern so these are redundant but both are retained for backwards compatibility. The bumps pattern is also identical to bozo when used anywhere except in a normal statement. When used as a normal pattern, bumps uses a slightly different method to perturb the normal with a similar noise function.
The bozo noise function has the following properties:
1. It's defined over 3D space i.e., it takes x, y, and z and returns the noise value there.
2. If two points are far apart, the noise values at those points are relatively random.
3. If two points are close together, the noise values at those points are close to each other.
You can visualize this as having a large room and a thermometer that ranges from 0.0 to 1.0. Each point in the room has a temperature. Points that are far apart have relatively random temperatures. Points that are close together have close temperatures. The temperature changes smoothly but randomly as we move through the room.
Now let's place an object into this room along with an artist. The artist measures the temperature at each point on the object and paints that point a different color depending on the temperature. What do we get? A POV-Ray bozo texture!
The brick pattern generates a pattern of bricks. The bricks are offset by half a brick length on every other row in the x- and z-directions. A layer of mortar surrounds each brick. The syntax is given by
pigment {brick COLOR_1, COLOR_2brick_size <Size>]mortar Size]}where COLOR_1 is the color of the mortar and COLOR_2 is the color of the brick itself. If no colors are specified a default deep red and dark gray are used. The default size of the brick and mortar together is <8, 3, 4.5> units. The default thickness of the mortar is 0.5 units. These values may be changed using the optional brick_size and mortar pattern modifiers. You may also use pigment statements in place of the colors. For example:
  pigment {

    brick pigment{Jade}, pigment{Black_Marble}

  }
This example uses normals:
normal { brick 0.5 }
The float value is an optional bump size. You may also use full normal statements. For example:
  normal {

    brick normal{bumps 0.2}, normal{granite 0.3}

  }
When used with textures, the syntax is
  texture {

    brick texture{T_Gold_1A}, texture{Stone12}

  }
This is a block pattern which cannot use wave types, color_map, or slope_map modifiers.
The bumps pattern was originally designed only to be used as a normal pattern. It uses a very smooth, random noise function that creates the look of rolling hills when scaled large or a bumpy orange peal when scaled small. Usually the bumps are about 1 unit apart.
When used as a normal pattern, this pattern uses a specialized normal perturbation function. This means that the pattern cannot be used with normal_map, slope_map or wave type modifiers in a normal statement.
When used as a pigment pattern or texture pattern, the bumps pattern is identical to bozo or spotted and is similar to normal bumps but is not identical as are most normals when compared to pigments.
The checker pattern produces a checkered pattern consisting of alternating squares of two colors. The syntax is:
- pigment { checker
, COLOR_2]] [PATTERN_MODIFIERS...] }
If no colors are specified then default blue and green colors are used.
The checker pattern is actually a series of cubes that are one unit in size. Imagine a bunch of 1 inch cubes made from two different colors of modeling clay. Now imagine arranging the cubes in an alternating check pattern and stacking them in layer after layer so that the colors still alternate in every direction. Eventually you would have a larger cube. The pattern of checks on each side is what the POV-Ray checker pattern produces when applied to a box object. Finally imagine cutting away at the cube until it is carved into a smooth sphere or any other shape. This is what the checker pattern would look like on an object of any kind.
You may also use pigment statements in place of the colors. For example:
pigment { checker pigment{Jade}, pigment{Black_Marble} }
This example uses normals:
normal { checker 0.5 }
The float value is an optional bump size. You may also use full normal statements. For example:
  normal {

    checker normal{gradient x scale .2},

            normal{gradient y scale .2}

  }
When used with textures, the syntax is
texture { checker texture{T_Wood_3A},texture{Stone12} }
This use of checker as a texture pattern replaces the special tiles texture in previous versions of POV-Ray. You may still use tiles but it may be phased out in future versions so checker textures are best.
This is a block pattern which cannot use wave types, color_map, or slope_map modifiers.
The crackle pattern is a set of random tiled polygons. With a large scale and no turbulence it makes a pretty good stone wall or floor. With a small scale and no turbulence it makes a pretty good crackle ceramic glaze. Using high turbulence it makes a good marble that avoids the problem of apparent parallel layers in traditional marble.
Mathematically, the set crackle(p)=0 is a 3D Voronoi diagram of a field of semi random points and crackle(p) < 0 is the distance from the set along the shortest path (a Voronoi diagram is the locus of points equidistant from their two nearest neighbors from a set of disjoint points, like the membranes in suds are to the centers of the bubbles).
The cylindrical pattern creates a one unit radius cylinder along the Y axis. It is computed by:
value = 1.0-min(1, sqrt(X^2 + Z^2))
It starts at 1.0 at the origin and increases to a minimum value of 0.0 as it approaches a distance of 1 unit from the Y axis. It remains at 0.0 for all areas beyond that distance. This pattern was originally created for use with halo or media but it may be used anywhere any pattern may be used.
The density_file pattern is a 3-D bitmap pattern that occupies a unit cube from location <0,0,0> to <1,1,1>. The data file is a raw binary file format created for POV-Ray called df3 format. The syntax provides for the possibility of implementing other formats in the future. This pattern was originally created for use with halo or media but it may be used anywhere any pattern may be used. The syntax is:
- pigment {density_file df3
interpolate Type] [PIGMENT_MODIFIERS...] }
where "filename.df3" is a file name of the data file.
As a normal pattern, the syntax is
- normal {density_file df3
, Bump_Size]
interpolate Type] [NORMAL_MODIFIERS...]
}
The optional float Bump_Size should follow the file name and any other modifiers follow that.
The df3 format consists of a 6 byte header of three 16-bit integers with high order byte first. These three values give the x,y,z size of the data in pixels (or more appropriately called voxels). This is followed by x*y*z unsigned integer bytes of data. The data in the range of 0 to 255 is scaled into a float value in the range 0.0 to 1.0. It remains at 0.0 for all areas beyond the unit cube. The pattern occupies the unit cube regardless of the dimensions in voxels.
The interpolate keyword may be specified to add interpolation of the data. The default value of zero specifies no interpolation. A value of one specifies tri-linear interpolation.
See the sample scenes for data file include\spiral.df3,and the scenes which use it: scenes\textures\surfaces\densfile.pov, scenes\interior\media\galaxy.pov for examples.
The dents pattern was originally designed only to be used as a normal pattern. It is especially interesting when used with metallic textures. It gives impressions into the metal surface that look like dents have been beaten into the surface with a hammer. Usually the dents are about 1 unit apart.
When used as a normal pattern, this pattern uses a specialized normal perturbation function. This means that the pattern cannot be used with normal_map, slope_map or wave type modifiers in a normal statement.
When used as a pigment pattern or texture pattern, the dents pattern is similar to normal dents but is not identical as are most normals when compared to pigments.
One of the simplest patterns is the gradient pattern. It is specified as
- pigment {gradient
}
where <Orientation> is a vector pointing in the direction that the colors blend. For example
   pigment { gradient x } // bands of color vary as you move

                          // along the "x" direction.
produces a series of smooth bands of color that look like layers of colors next to each other. Points at x=0 are the first color in the color map. As the x location increases it smoothly turns to the last color at x=1. Then it starts over with the first again and gradually turns into the last color at x=2. The pattern reverses for negative values of x. Using gradient y or gradient z makes the colors blend along the y- or z-axis. Any vector may be used but x, y and z are most common.
As a normal pattern, gradient generates a saw-tooth or ramped wave appearance. The syntax is
- normal {gradient
, Bump_Size] [NORMAL_MODIFIERS...] }
where the vector <Orientation> is a required parameter but the float Bump_Size which follows is optional. Note that the comma is required especially if Bump_Size is negative.
The granite pattern uses a simple 1/f fractal noise function to give a good granite pattern. This pattern is used with creative color maps in stones.inc to create some gorgeous layered stone textures.
As a normal pattern it creates an extremely bumpy surface that looks like a gravel driveway or rough stone.
The hexagon pattern is a block pattern that generates a repeating pattern of hexagons in the x-y-plane. In this instance imagine tall rods that are hexagonal in shape and are parallel to the y-axis and grouped in bundles like shown in the example image. Three separate colors should be specified as follows:
- pigment{hexagon
, COLOR_2 [, COLOR_3]]] [PATTERN_MODIFIERS...] }
The hexagon pattern.
The three colors will repeat the hexagonal pattern with hexagon COLOR_1 centered at the origin, COLOR_2 in the +z-direction and COLOR_3 to either side. Each side of the hexagon is one unit long. The hexagonal rods of color extend infinitely in the +y- and -y-directions. If no colors are specified then default blue, green and red colors are used.
You may also use pigment statements in place of the colors. For example:
  pigment {

    hexagon pigment { Jade },

            pigment { White_Marble },

            pigment { Black_Marble }

  }
This example uses normals:
normal { hexagon 0.5 }
The float value is an optional bump size. You may also use full normal statements. For example:
  normal {

    hexagon

      normal { gradient x scale .2 },

      normal { gradient y scale .2 },

      normal { bumps scale .2 }

  }
When used with textures, the syntax is...
  texture {

    hexagon

      texture { T_Gold_3A },

      texture { T_Wood_3A },

      texture { Stone12 }

  }
This is a block pattern which cannot use wave types, color_map, or slope_map modifiers.
Leopard creates regular geometric pattern of circular spots. The formula used is:
value = Sqr((sin(x)+sin(y)+sin(z))/3)
The mandel pattern computes the standard Mandelbrot fractal pattern and projects it onto the x-y-plane. It uses the x and y coordinates to compute the Mandelbrot set.
It is specified as
- pigment {mandel
}
The pattern is specified with the keyword mandel followed by an integer number. This number is the maximum number of iterations to be used to compute the set. Typical values range from 10 up to 256 but any positive integer may be used. For example:
  pigment {

    mandel 25

    color_map {

      [0.0  color Cyan]

      [0.3  color Yellow]

      [0.6  color Magenta]

      [1.0  color Cyan]

    }

    scale .5

  }
The value passed to the color map is computed by the formula:
value = number_of_iterations / max_iterations
When used as a normal pattern, the syntax is...
- normal{mandel
, Bump_Size] [NORMAL_MODIFIERS...] }
where the integer Max_Iteration is a required parameter but the float Bump_Size which follows is optional. Note that the comma is required especially if Bump_Size is negative.
The marble pattern is very similar to the gradient x pattern. The gradient pattern uses a default ramp_wave wave type which means it uses colors from the color map from 0.0 up to 1.0 at location x=1 but then jumps back to the first color for x > 1 and repeats the pattern again and again. However the marble pattern uses the triangle_wave wave type in which it uses the color map from 0 to 1 but then it reverses the map and blends from 1 back to zero. For example:
  pigment {

    gradient x

    color_map {

      [0.0  color Yellow]

      [1.0  color Cyan]

    }

  }
This blends from yellow to cyan and then it abruptly changes back to yellow and repeats. However replacing gradient x with marble smoothly blends from yellow to cyan as the x coordinate goes from 0.0 to 0.5 and then smoothly blends back from cyan to yellow by x=1.0.
Earlier versions of POV-Ray did not allow you to change wave types. Now that wave types can be changed for most any pattern, the distinction between marble and gradient x is only a matter of default wave types.
When used with turbulence and an appropriate color map, this pattern looks like veins of color of real marble, jade or other types of stone. By default, marble has no turbulence.
The onion is a pattern of concentric spheres like the layers of an onion.
Value = mod(sqrt(Sqr(X)+Sqr(Y)+Sqr(Z)), 1.0)
Each layer is one unit thick.
The planar pattern creates a horizontal stripe plus or minus one unit above and below the X-Z plane. It is computed by:
value =1.0- min(1, abs(Y))
It starts at 1.0 at the origin and increases to a minimum value of 0.0 as the Y values approaches a distance of 1 unit from the X-Z plane. It remains at 0.0 for all areas beyond that distance. This pattern was originally created for use with halo or media but it may be used anywhere any pattern may be used.
The quilted pattern was originally designed only to be used as a normal pattern. The quilted pattern is so named because it can create a pattern somewhat like a quilt or a tiled surface. The squares are actually 3-D cubes that are 1 unit in size.
When used as a normal pattern, this pattern uses a specialized normal perturbation function. This means that the pattern cannot be used with normal_map, slope_map or wave type modifiers in a normal statement.
When used as a pigment pattern or texture pattern, the quilted pattern is similar to normal quilted but is not identical as are most normals when compared to pigments.
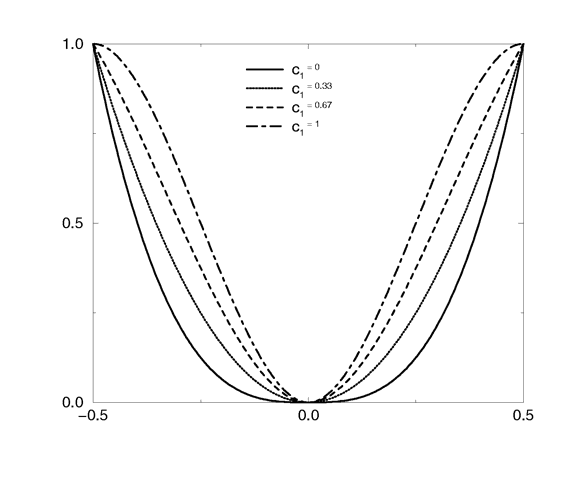
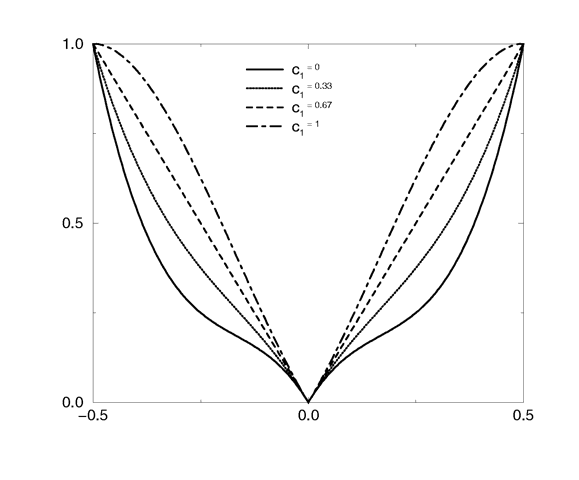
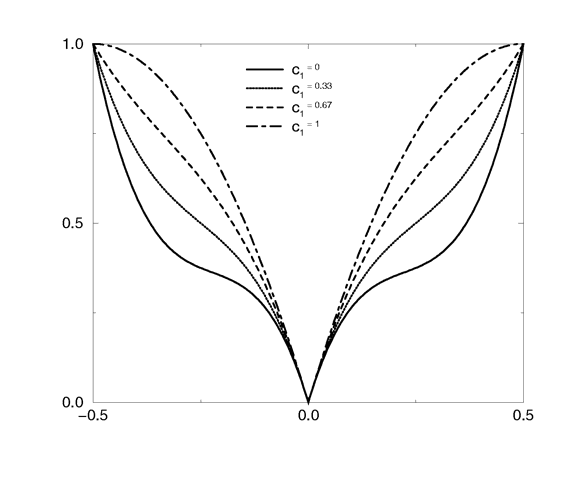
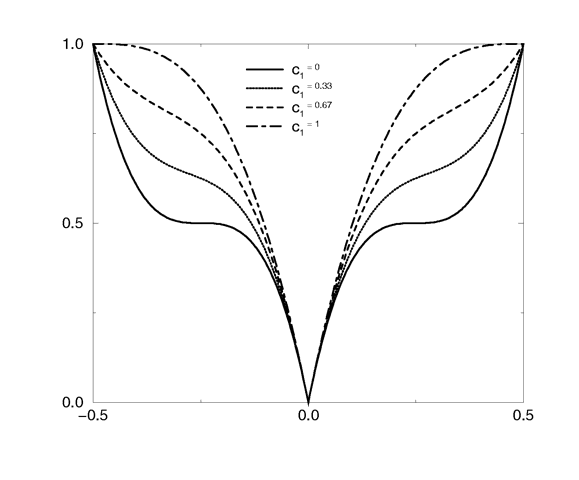
The two parameters control0 and control1 are used to adjust the curvature of the seam or gouge area between the quilts. The syntax is:
It is specified as
- pigment {quilted
}
control0 control Value_1 | PIGMENT_MODIFIERS
The values should generally be kept to around the 0.0 to 1.0 range. The default value is 1.0 if none is specified. Think of this gouge between the tiles in cross-section as a sloped line.
Quilted pattern with c0=0 and different values for c1.
Quilted pattern with c0=0.33 and different values for c1.
Quilted pattern with c0=0.67 and different values for c1.
Quilted pattern with c0=1 and different values for c1.
This straight slope can be made to curve by adjusting the two control values. The control values adjust the slope at the top and bottom of the curve. A control values of 0 at both ends will give a linear slope, as shown above, yielding a hard edge. A control value of 1 at both ends will give an "s" shaped curve, resulting in a softer, more rounded edge.
The radial pattern is a radial blend that wraps around the +y-axis. The color for value 0.0 starts at the +x-direction and wraps the color map around from east to west with 0.25 in the -z-direction, 0.5 in -x, 0.75 at +z and back to 1.0 at +x. Typically the pattern is used with a frequency modifier to create multiple bands that radiate from the y-axis. For example:
  pigement {

    radial color_map{[0.5 Black][0.5 White]}

    frequency 10

  }
creates 10 white bands and 10 black bands radiating from the y axis.
The ripples pattern was originally designed only to be used as a normal pattern. It makes the surface look like ripples of water. The ripples radiate from 10 random locations inside the unit cube area <0,0,0> to <1,1,1>. Scale the pattern to make the centers closer or farther apart.
Usually the ripples from any given center are about 1 unit apart. The frequency keyword changes the spacing between ripples. The phase keyword can be used to move the ripples outwards for realistic animation.
The number of ripple centers can be changed with the global parameter
- global_settings{number_of_waves
}
somewhere in the scene. This affects the entire scene. You cannot change the number of wave centers on individual patterns. See section "Number_Of_Waves" for details.
When used as a normal pattern, this pattern uses a specialized normal perturbation function. This means that the pattern cannot be used with normal_map, slope_map or wave type modifiers in a normal statement.
When used as a pigment pattern or texture pattern, the ripples pattern is similar to normal ripples but is not identical as are most normals when compared to pigments.
The spherical pattern creates a one unit radius sphere along the Y axis. It is computed by:
value = 1.0-min(1, sqrt(X^2 + Y^2 + Z^2))
It starts at 1.0 at the origin and increases to a max value of 0.0 as it approaches a distance of 1 unit from the origin in any direction. It remains at 0.0 for all areas beyond that distance. This pattern was originally created for use with halo or media but it may be used anywhere any pattern may be used.
The spiral1 pattern creates a spiral that winds around the y-axis similar to a screw. When viewed sliced in the X-Z plane, it looks like the spiral arms of a galaxy. Its syntax is:
- pigment {spiral1
}
The Number_of_Arms value determines how may arms are winding around the y-axis.
As a normal pattern, the syntax is
- normal {spiral1
, Bump_Size] [NORMAL_MODIFIERS...] }
where the vector <Orientation> is a required parameter but the float Bump_Size which follows is optional. Note that the comma is required especially if Bump_Size is negative.
The pattern uses the triangle_wave wave type by default but may use any wave type.
The spiral2 pattern creates a double spiral that winds around the y-axis similar spiral1 except it is two overlapping spirals the twist in opposite directions. The results sometimes looks like a basket weave or perhaps the skin of pineapple. The center of a sunflower also has a similar double spiral pattern. Its syntax is:
- pigment {spiral2
}
The Number_of_Arms value determines how may arms are winding around the y-axis.
As a normal pattern, the syntax is
- normal {spiral2
, Bump_Size] [NORMAL_MODIFIERS...] }
where the vector <Orientation> is a required parameter but the float Bump_Size which follows is optional. Note that the comma is required especially if Bump_Size is negative.
The pattern uses the triangle_wave wave type by default but may use any wave type.
The spotted pattern is identical to the bozo pattern. Early versions of POV-Ray did not allow turbulence to be used with spotted. Now that any pattern can use turbulence there is no difference between bozo and spotted. See section "Bozo" for details.
The waves pattern was originally designed only to be used as a normal pattern. It makes the surface look like waves on water. The waves pattern looks similar to the ripples pattern except the features are rounder and broader. The effect is to make waves that look more like deep ocean waves. The waves radiate from 10 random locations inside the unit cube area <0,0,0> to <1,1,1>. Scale the pattern to make the centers closer or farther apart.
Usually the waves from any given center are about 1 unit apart. The frequency keyword changes the spacing between waves. The phase keyword can be used to move the waves outwards for realistic animation.
The number of wave centers can be changed with the global parameter
- global_settings{number_of_waves
}
somewhere in the scene. This affects the entire scene. You cannot change the number of wave centers on individual patterns. See section "Number_Of_Waves" for details.
When used as a normal pattern, this pattern uses a specialized normal perturbation function. This means that the pattern cannot be used with normal_map, slope_map or wave type modifiers in a normal statement.
When used as a pigment pattern or texture pattern, the waves pattern is similar to normal waves but is not identical as are most normals when compared to pigments.
The wood pattern consists of concentric cylinders centered on the z-axis. When appropriately colored, the bands look like the growth rings and veins in real wood. Small amounts of turbulence should be added to make it look more realistic. By default, wood has no turbulence.
Unlike most patterns, the wood pattern uses the triangle_wave wave type by default. This means that like marble, wood uses color map values 0.0 to 1.0 then repeats the colors in reverse order from 1.0 to 0.0. However you may use any wave type.
The wrinkles pattern was originally designed only to be used as a normal pattern. It uses a 1/f noise pattern similar to granite but the features in wrinkles are sharper. The pattern can be used to simulate wrinkled cellophane or foil. It also makes an excellent stucco texture.
When used as a normal pattern, this pattern uses a specialized normal perturbation function. This means that the pattern cannot be used with normal_map, slope_map or wave type modifiers in a normal statement.
When used as a pigment pattern or texture pattern, the wrinkles pattern is similar to normal wrinkles but is not identical as are most normals when compared to pigments.