You can use the fog feature to add fog of two different types to your scene: constant fog and ground fog. The constant fog has a constant density everywhere while the ground fog's density decreases as you move upwards.
The usage of both fog types will be described in the next sections in detail.
The simplest fog type is the constant fog that has a constant density in all locations. It is specified by a distance keyword which actually describes the fog's density and a fog color.
The distance value determines the distance at which 36.8% of the background are still visible (for a more detailed explanation of how the fog is calculated read the reference section "Fog").
The fog color can be used to create anything from a pure white to a red, blood-colored fog. You can also use a black fog to simulate the effect of a limited range of vision.
The following example will show you how to add fog to a simple scene (fog1.pov).
#include "colors.inc"
camera {
location <0, 20, -100>
}
background { color SkyBlue }
plane { y, -10
pigment {
checker color Yellow color Green
scale 20
}
}
sphere { <0, 25, 0>, 40
pigment { Red }
finish { phong 1.0 phong_size 20 }
}
sphere { <-100, 150, 200>, 20
pigment { Green }
finish { phong 1.0 phong_size 20 }
}
sphere { <100, 25, 100>, 30
pigment { Blue }
finish { phong 1.0 phong_size 20 }
}
light_source { <100, 120, 40> color White}
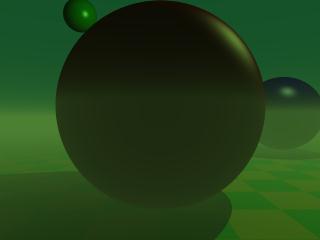
fog {
distance 150
color rgb<0.3, 0.5, 0.2>
}
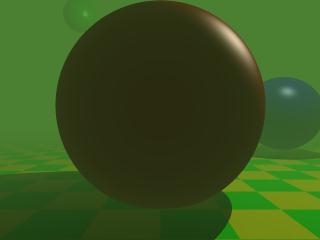
A foggy scene.
According to their distance the spheres in this scene more or less vanish in the greenish fog we used, as does the checkerboard plane.
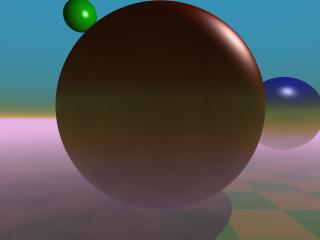
If you want to make sure that the background does not completely vanish in the fog you can set the transmittance channel of the fog's color to the amount of background you always want to be visible.
Using as transmittance value of 0.2 as in
  fog {

    distance 150

    color rgbt<0.3, 0.5, 0.2, 0.2>

  }
the fog's translucency never drops below 20% as you can see in the resulting image (fog2.pov).
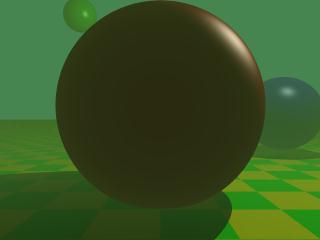
Adding a translucency threshold you make sure that the background does not vanish.
The greenish fog we have used so far doesn't filter the light passing through it. All it does is to diminish the light's intensity. We can change this by using a non-zero filter channel in the fog's color (fog3.pov).
  fog {

    distance 150

    color rgbf<0.3, 0.5, 0.2, 1.0>

  }
The filter value determines the amount of light that is filtered by the fog. In our example 100% of the light passing through the fog will be filtered by the fog. If we had used a value of 0.7 only 70% of the light would have been filtered. The remaining 30% would have passed unfiltered.
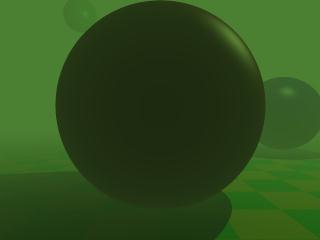
A filtering fog.
You'll notice that the intensity of the objects in the fog is not only diminished due to the fog's color but that the colors are actually influenced by the fog. The red and especially the blue sphere got a green hue.
In order to make our somewhat boring fog a little bit more interesting we can add some turbulence, making it look like it had a non-constant density (fog4.pov).
  fog {

    distance 150

    color rgbf<0.3, 0.5, 0.2, 1.0>

    turbulence 0.2

    turb_depth 0.3

  }
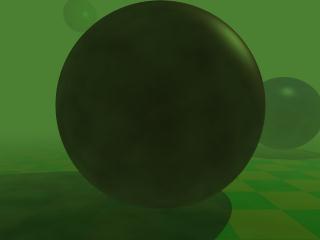
Adding some turbulence makes the fog more interesting.
The turbulence keyword is used to specify the amount of turbulence used while the turb_depth value is used to move the point at which the turbulence value is calculated along the viewing ray. Values near zero move the point to the viewer while values near one move it to the intersection point (the default value is 0.5). This parameter can be used to avoid noise that may appear in the fog due to the turbulence (this normally happens at very far away intersection points, especially if no intersection occurs, i. e. the background is hit). If this happens just lower the turb_depth value until the noise vanishes.
You should keep in mind that the actual density of the fog does not change. Only the distance-based attenuation value of the fog is modified by the turbulence value at a point along the viewing ray.
The much more interesting and flexible fog type is the ground fog, which is selected with the fog_type statement. It's appearance is described with the fog_offset and fog_alt keywords. The fog_offset specifies the height, i. e. y value, below which the fog has a constant density of one. The fog_alt keyword determines how fast the density of the fog will approach zero as one moves along the y axis. At a height of fog_offset+fog_alt the fog will have a density of 25%.
The following example (fog5.pov) uses a ground fog which has a constant density below y=25 (the center of the red sphere) and quickly falls off for increasing altitudes.
  fog {

    distance 150

    color rgbf<0.3, 0.5, 0.2, 1.0>

    fog_type 2

    fog_offset 25

    fog_alt 1

  }
The ground fog only covers the lower parts of the world.'
It is possible to use several layers of fog by using more than one fog statement in your scene file. This is quite useful if you want to get nice effects using turbulent ground fogs. You could add up several, differently colored fogs to create an eerie scene for example.
Just try the following example (fog6.pov).
  fog {

    distance 150

    color rgb<0.3, 0.5, 0.2>

    fog_type 2

    fog_offset 25

    fog_alt 1

    turbulence 0.1

    turb_depth 0.2

  }

  fog {

    distance 150

    color rgb<0.5, 0.1, 0.1>

    fog_type 2

    fog_offset 15

    fog_alt 4

    turbulence 0.2

    turb_depth 0.2

  }

  fog {

    distance 150

    color rgb<0.1, 0.1, 0.6>

    fog_type 2

    fog_offset 10

    fog_alt 2

  }
Quite nice results can be achieved using multiple layers of fog.
You can combine constant density fogs, ground fogs, filtering fogs, non-filtering fogs, fogs with a translucency threshold, etc.
Whenever you use the fog feature and the camera is inside a non-hollow object you won't get any fog effects. For a detailed explanation why this happens see "Empty and Solid Objects".
In order to avoid this problem you have to make all those objects hollow by either making sure the camera is outside these objects (using the inverse keyword) or by adding the hollow to them (which is much easier).