Creating text objects using POV-Ray always used to mean that the letters had to be built either from CSG, a painstaking process or by using a black and white image of the letters as a height field, a method that was only somewhat satisfactory. Now, for POV-Ray 3.0, a new primitive has been introduced that can use any TrueType font to create text objects. These objects can be used in CSG, transformed and textured just like any other POV primitive.
For this tutorial, we will make two uses of the text object. First, let's just make some block letters sitting on a checkered plane. Any TTF font should do, but for this tutorial, we will use the ones bundled with POV-Ray 3.0.
We create a file called textdemo.pov and edit it as follows:
  #include "colors.inc"

  camera {

    location <0, 1, -10>

    look_at 0

    angle 35

  }

  light_source { <500,500,-1000> White }

  plane { y,0

    pigment { checker Green White }

  }
Now let's add the text object. We will use the font timrom.ttf and we will create the string "POV-RAY 3.0". For now, we will just make the letters red. The syntax is very simple. The first string in quotes is the font name, the second one is the string to be rendered. The two floats are the thickness and offset values. The thickness float determines how thick the block letters will be. Values of .5 to 2 are usually best for this. The offset value will add to the kerning distance of the letters. We will leave this a 0 for now.
  text { ttf "timrom.ttf" "POV-RAY 3.0" 1, 0

    pigment { Red }

  }
Rendering this at 200x150 -A, we notice that the letters are off to the right of the screen. This is because they are placed so that the lower left front corner of the first letter is at the origin. To center the string we need to translate it -x some distance. But how far? In the docs we see that the letters are all 0.5 to 0.75 units high. If we assume that each one takes about 0.5 units of space on the x-axis, this means that the string is about 6 units long (12 characters and spaces). Let's translate the string 3 units along the negative x-axis.
  text { ttf "timrom.ttf" "POV-RAY 3.0" 1, 0

    pigment { Red }

    translate -3*x

  }
That's better. Now let's play around with some of the parameters of the text object. First, let's raise the thickness float to something outlandish... say 25!
  text { ttf "timrom.ttf" "POV-RAY 3.0" 25, 0

    pigment { Red }

    translate -2.25*x

  }
Actually, that's kind of cool. Now let's return the thickness value to 1 and try a different offset value. Change the offset float from 0 to 0.1 and render it again.
Wait a minute?! The letters go wandering off up at an angle! That is not what the docs describe! It almost looks as if the offset value applies in both the x- and y-axis instead of just the x axis like we intended. Could it be that a vector is called for here instead of a float? Let's try it. We replace 0.1 with 0.1*x and render it again.
That works! The letters are still in a straight line along the x-axis, just a little further apart. Let's verify this and try to offset just in the y-axis. We replace 0.1*x with 0.1*y. Again, this works as expected with the letters going up to the right at an angle with no additional distance added along the x-axis. Now let's try the z-axis. We replace 0.1*y with 0.1*z. Rendering this yields a disappointment. No offset occurs! The offset value can only be applied in the x- and y-directions.
Let's finish our scene by giving a fancier texture to the block letters, using that cool large thickness value, and adding a slight y-offset. For fun, we will throw in a sky sphere, dandy up our plane a bit, and use a little more interesting camera viewpoint (we render the following scene at 640x480 +A0.2):
  #include "colors.inc"

  camera {

    location <-5,.15,-2>

    look_at <.3,.2,1>

    angle 35

  }

  light_source { <500,500,-1000> White }

  plane { y,0

    texture {

      pigment { SeaGreen }

      finish { reflection .35 specular 1 }

      normal { ripples .35 turbulence .5 scale .25 }

    }

  }

  text { ttf "timrom.ttf" "POV-RAY 3.0" 25, 0.1*y

    pigment { BrightGold }

    finish { reflection .25 specular 1 }

    translate -3*x

  }

  #include "skies.inc"

  sky_sphere { S_Cloud5 }
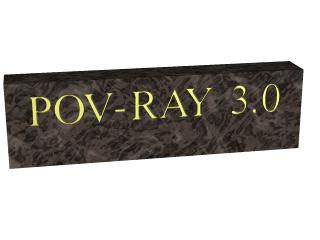
Let's try using text in a CSG object. We will attempt to create an inlay in a stone block using a text object. We create a new file called textcsg.pov and edit it as follows:
  #include "colors.inc"

  #include "stones.inc"

  background { color rgb 1 }

  camera {

    location <-3, 5, -15>

    look_at 0

    angle 25

  }

  light_source { <500,500,-1000> White }
Now let's create the block. We want it to be about eight units across because our text string "POV-RAY 3.0" is about six units long. We also want it about four units high and about one unit deep. But we need to avoid a potential coincident surface with the text object so we will make the first z-coordinate 0.1 instead of 0. Finally, we will give this block a nice stone texture.
  box { <-3.5, -1, 0.1>, <3.5, 1, 1>

    texture { T_Stone10 }

  }
Next, we want to make the text object. We can use the same object we used in the first tutorial except we will use slightly different thickness and offset values.
  text { ttf "timrom.ttf" "POV-RAY 3.0" 0.15, 0

    pigment { BrightGold }

    finish { reflection .25 specular 1 }

    translate -3*x

  }
We remember that the text object is placed by default so that its front surface lies directly on the x-y-plane. If the front of the box begins at z=0.1 and thickness is set at 0.15, the depth of the inlay will be 0.05 units. We place a difference block around the two objects.
  difference {

    box { <-3.5, -1, 0.1>, <3.5, 1, 1>

      texture { T_Stone10 }

    }

    text { ttf "timrom.ttf" "POV-RAY 3.0" 0.15, 0

      pigment { BrightGold }

      finish { reflection .25 specular 1 }

      translate -3*x

    }

  }
Text carved from stone.
We render this at 200x150 -A. We can see the inlay clearly and that it is indeed a bright gold color. We re-render at 640x480 +A0.2 to see the results more clearly, but be forewarned... this trace will take a little time.